|
|
| Page contents and important links |
| This page |
| PDF files (...all pdf files willopen in a new window.) |
|
| Other important links |
WARNING -
- WARNING |
DO NOT
SHOOT ANYTHING OTHER THAN THE PLASTIC BALL IN THE LAUNCHER. Failure to follow
this rule will result in an instant "F."
OVERVIEW
You will launch a ball straight up and use the photogate to determine its initial speed. Using this data, calculate the balls initial velocity. Then angle the launcher somewhere between 75 and 85 degrees. Make some calculations as to where the ball will land. Place a target on the floor indicating the landing spot. Cover up this sheet with a piece of carbon paper. Upon receiving the teachers permission, launch the ball and hit the target on the first try. The carbon paper will leave an impact mark on the target sheet where the ball lands. Finish by calculating the percent error.
Materials
|
Photogate/CBL/TI-84 |
Ball Launcher |
|
Yellow plastic ball |
Meter stick |
|
Plumb Bob (share with other groups) |
C-Clamp |
|
ÐGrade sheetÓ |
Target sheet |
INSTRUCTIONS
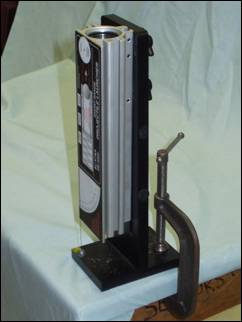
Using a ÐC-ClampÓ attach the launcher to the table as shown.
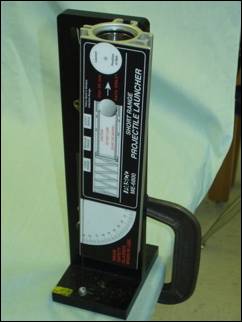
The bottom of the launcher has a protractor. This will tell you the angle of the launcher. When you set this up, adjust it so that it reads the angle you you are lanching at. The protractor part of the launcher is shown to the right.

 Adjust
the launcher such that it is pointing at the angle you you are lanching. To easily adjust the
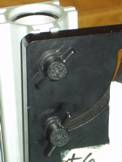
launcher's angle, loosen or tighten the two black bolts on the back of the
launcher. These bolts are shown to the right.
Adjust
the launcher such that it is pointing at the angle you you are lanching. To easily adjust the
launcher's angle, loosen or tighten the two black bolts on the back of the
launcher. These bolts are shown to the right.
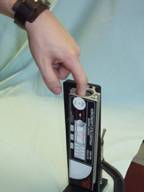 To
load the launcher, place a yellow ball in the top and push down with your
finger. Push down until you hear one click. Your finger will only need to go in
about 1.5 inches. The launcher has three launch positions or "clicks.Ó The two
higher launch positions decrease accuracy. Do not use them. It you accidentally
push the ball down too far, hold you hand on top of the launcher and launch.
The ball will not hurt your hand.
To
load the launcher, place a yellow ball in the top and push down with your
finger. Push down until you hear one click. Your finger will only need to go in
about 1.5 inches. The launcher has three launch positions or "clicks.Ó The two
higher launch positions decrease accuracy. Do not use them. It you accidentally
push the ball down too far, hold you hand on top of the launcher and launch.
The ball will not hurt your hand.

Launch the ball by pulling on the lever on the launcher's side; as shown to the right.
Launch the ball upat your angle using the lowest setting. Catc the ball in a paper bag such thatyou will not be able to predict where it will land.

Orient the photogate across
the top of the launcher. Make sure the holes, where the beam crosses the
photogate goes across the center of the hole. Follow the instructions on the
photogate sheet and use the gate method to measure the velocity of the ball.
The balls diameter is 0.0254 m.
Get five reliable results and write them on the grade sheet. Take an average of these initial velocities. When the launcher is tilted the ball will fire out at this same initial velocity.
 On
the side of the launcher, near the top is a picture of a ball. This is the
location where the plastic ball becomes a projectile. Measure from the bottom
of this large picture to the ground to get the distance the ball falls. Record
this number on the grade sheet.
On
the side of the launcher, near the top is a picture of a ball. This is the
location where the plastic ball becomes a projectile. Measure from the bottom
of this large picture to the ground to get the distance the ball falls. Record
this number on the grade sheet.
Decide on a launch angle between 80 and 87 degrees. Calculate the range of the ball to where it will land on the floor. Show your calculations on the grade sheet.
The horizontal distance is measured from the center of the ÐLaunch position of the ballÓ picture. Look for the "+Ó sign on the picture. Use the plumb bob to get the exact location of the landing spot. Place the target sheet here and the carbon paper on top of the paper. DO NOT LAUNCH THE BALL WITHOUT THE TEACHERS PERMSSION.

Call the teacher over. You will launch the ball ONCE, after the teacher gives you permission. Do not launch the ball without the teacher watching. When the ball lands, it will leave a mark on the target sheet. This landing mark determines your starting point for your grade. The rest of the grade comes from your completeness of the work.
If you miss all the marks, the teacher will double check your work –if its not neat and complete you will lose more points at this time. If a mistake is found, then you will get the chance to launch again. However, the second time you launch you will take your score and subtract 2 points.
The teacher will write this started score on the grade sheet.
Upon landing in the circles and receiving a starter score, calculate the percent error on the grade sheet.
Turn in one copy of the
grade sheet per group.
Group members:_________________________________________________________________________________ DATA TABLE
CALCULATIONS
Height
the ball is launched from: ____________ Launch
angle: ____________________
PERCENT ERROR Show calculations for your data below.
|
| GRADE RECOVER SHEET |
| Get this information before leaving class. If you did nt pick up a copy before leavng class print the pdf version of this part of the page linked above. |
Your name: __________________________
Due date: Next class.
You may work with others on this assignment. I can help if you ask outside of class. (But I wont tell you if your answer is correct or how to do the whole assignment.)
This is to be done as homework. If your ball falls outside of your range lines then you can do this assignment to regain those lost points.

Given
the information above work backwards to find:
(1) The initial
velocity the ball should have left the launcher with to have landed where is did.
(Hint: In your givens table define the initial velocities as ![]() where θ is
the angle in the box above.)
where θ is
the angle in the box above.)
(2) The diameter the
ball should be if it is to go through the photogate, while being launched
vertically, with the average time in the box above.
Show your work neatly on a
separate sheet of paper. Staple it to this sheet when you turn it in.
(2)
Diameter (m): ........... _____________
ANSWERS:
![]() ..... _____________
..... _____________
Do not release
the ball without the teachers permission and presence.
The lines extend to the edge of the paper.
They are not printed that way because the printer will not print that wide. (
Landing on the line counts in the 21 point range. )
|
by Tony Wayne ...(If you are a teacher, please feel free to use these resources in your teaching.)
The owner of this website does not collect cookies when the site is visited. However, this site uses and or embeds Adobe, Apple, GoDaddy, Google, and YouTube products. These companies collect cookies when their producs are used on my pages. Click here to go to them to find out more about how they use their cookies. If you do not agree with any of their policies then leave this site now.

